
BaldrickInput1 Manual
Last updated 23 Oct 2026
Getting started
Welcome to your new BaldrickInput1! This comprehensive guide will walk you through everything you need to know to get your board up and running, from plugging in power to setting up your first interactive trigger.
Always ensure your power supply is disconnected before making any connections. Double-check all wiring before powering on.
Step 1: Powering the Board
Power Requirements
The Input1 has a Barrel Jack for power and can handle 5v-24v, whatever you use for this will be used to power the LAMP so don’t choose anything too large!
The Input1 is designed to use minimal power so it’s possible to run it from a USB power bank if you wish to make something portable.
The voltage you choose for power will also power the lamp output, so choose an appropriate voltage for your lamp.
Step 2: Installing the Firmware
Initial Firmware Setup
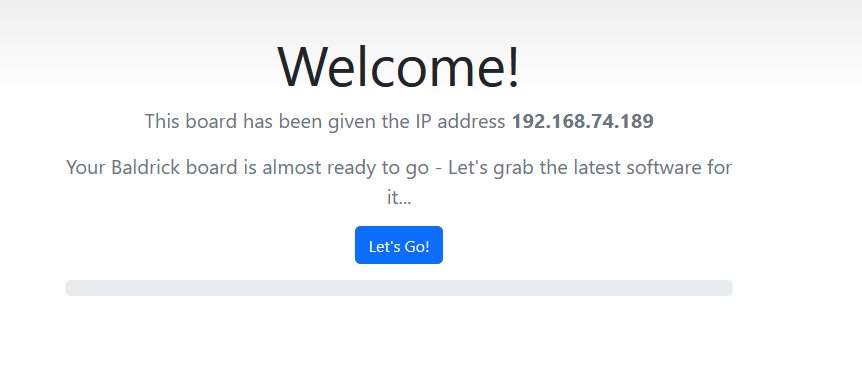
When your controller arrives it will be in a ‘sleeping state’ - you just need to plug it into your network and head to http://baldrickinput.local (if your DNS doesn’t accept that then just look for it on your network).
How to Install
To put it simply, press the button that says Lets Go then go and have a brew, the controller will connect to our server, download the latest firmware and automatically install it, once it’s done the page will refresh and you can start connecting your input.
You must plug the board directly into your network for the initial firmware download (or make sure your computer can give it an IP address and internet access).
How Do I Update After That?
When you go to the Web interface and look at the stats section, you’ll see the version number, if there is a new version, you can click that and it will automatically update in a similar interface to how this initial install works.
Step 3: Wire it up!
Connecting Your Input Device
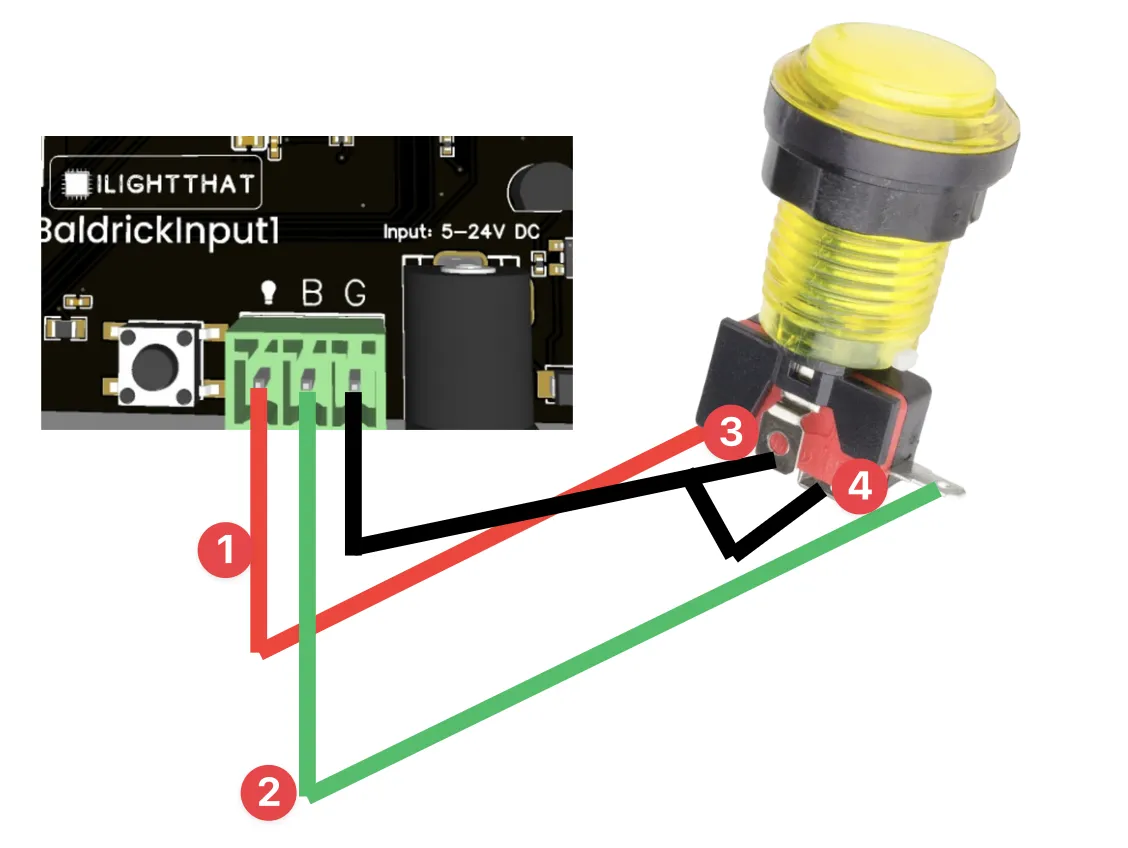
It’s time to wire up the input, in this example we are going to use a button but the Input1 will work with many different types of sensors.
Wiring Connections
- Lamp - This should be attached to the + side of your button LED (if not using a button with an LED this can be ignored)
- Button - This should be attached to the switch section of the button or input
- Ground button - This should be attached to the ground section of the button or input
- Ground lamp - This should be attached to the ground section of the lamp (normally we just link the ground of the button to this)
The BaldrickInput1 supports various input types including buttons, motion sensors, reed switches, beam breaks, and other input devices.
Step 4: Setup the action!
Configuring Your Input Response
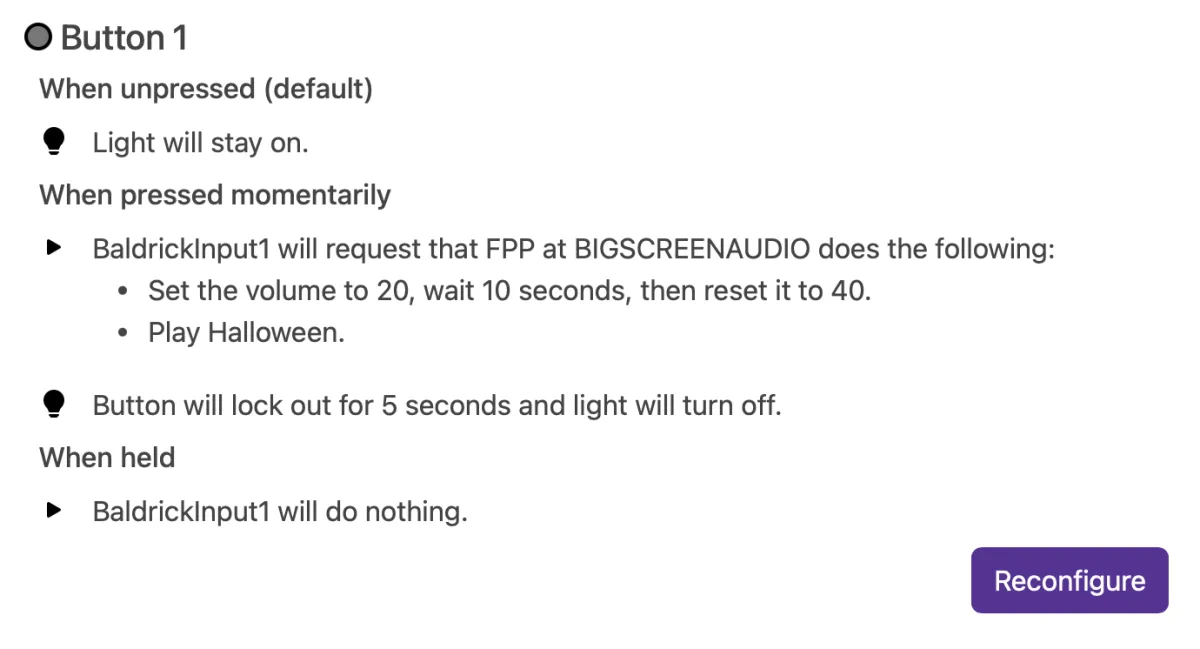
Now it’s time to configure what happens when your input is triggered. This is where the magic happens!
Available Actions
  <h6>FPP Integration</h6>
  <p>Control FPP (Falcon Pi Player) instances, change volume, play songs/playlists, or call FPP API directly.</p>
  <h6>Toggle Test Mode</h6>
  <p>Quickly enable any test mode at a specific brightness for quick prop testing.</p>
  <h6>BaldrickSwitchy Control</h6>
  <p>Turn on/off BaldrickSwitchy ports for specific durations (bubble machines, snow machines, etc.).</p>
  <h6>BaldrickDMX Presets</h6>
  <p>Activate preset commands on your BaldrickDMX for moving heads, effects, etc.</p>
  <h6>HTTP URL Calls</h6>
  <p>Call web APIs from simple triggers - perfect for custom integrations.</p>
  <h6>Do Nothing</h6>
  <p>Sometimes you set an input to do something and think "oh actually no, that's not what I want."</p>
The BaldrickInput1 includes lamp control capabilities, so you can also control a physical lamp or LED indicator when your input is triggered.
Technical specifications
At a glance
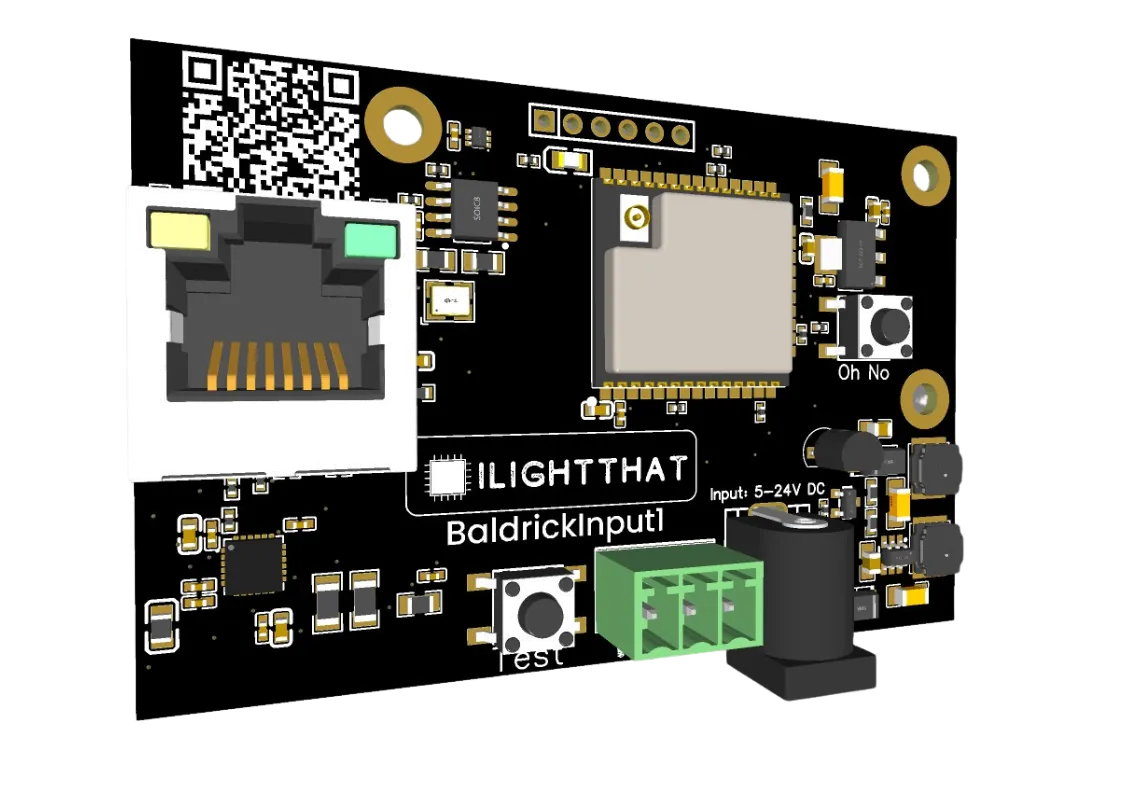
Board components
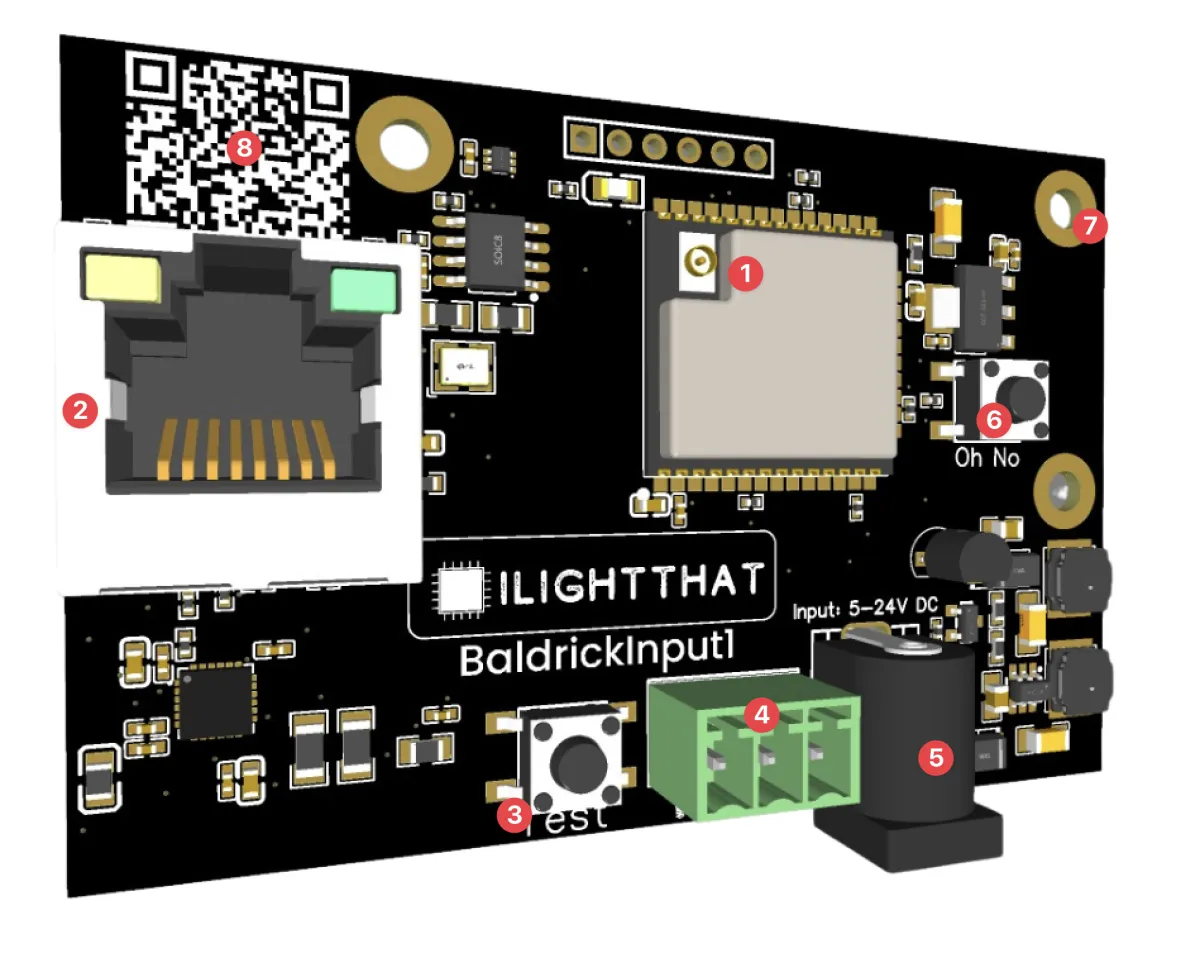
- Wireless Chip — The BaldrickInput1 can run on either Wifi or Ethernet (but to get the wifi working, you’ll need an antenna).
- 100mb Ethernet Port — You can use this to connect to your show network.
- Test Button — Use this to test what you’ve setup.
- Turniput — Connect a button, motion sensor, beambreak or anything here to trigger an effect (it also has an output for lamp control).
- Power Jack — Can take 5v to 24v (each side can take different voltages) and will automatically step down to power the components, no jumpers needed. Whatever voltage you used here is also used to power the lamp.
- Oh No button — Use this to reset the board by holding for 10 seconds when the board is booting.
- Mounting Holes — The BaldrickInput1 is classed as a small family member.
- QR Code — An easy to scan QR code which will take you to these docs for easy troubleshooting.
DO NOT DRILL out these holes to make them fit the screws you’ve got already, doing this will void any warranty.
Web interface
The BaldrickInput1 includes a powerful web-based configuration interface that allows you to set up and control your board from any web browser. This comprehensive guide covers every aspect of the web interface.
Stats Dashboard
System Information
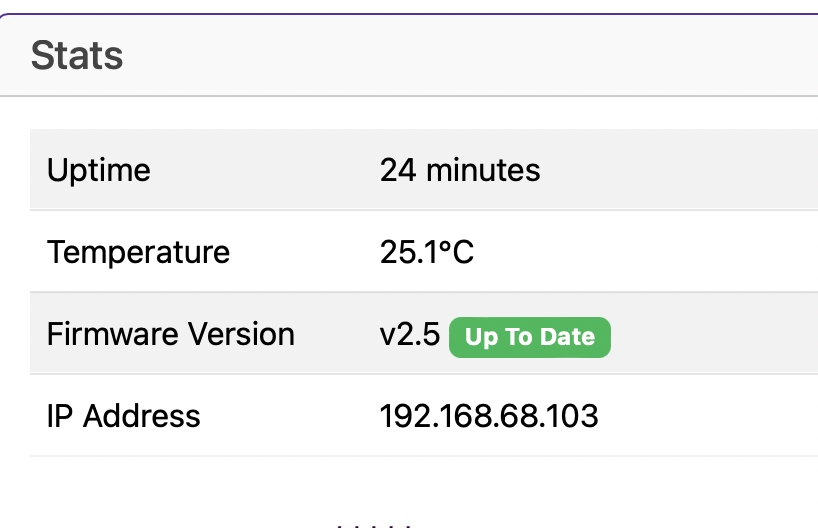
The Stats board gives you a heads up as to what’s going on with your controller.
<h5>Uptime</h5>
<p>Tells you how long your controller has been powered on <em>(this is useful in June to remind you that you forgot to turn it off over christmas)</em></p>
<h5>Temperature</h5>
<p>With a sensor next to the Ethernet connector, this gives you an indication of the board temperature <em>(in Celsius because water freezes at 0, not 32.. how does that make sense?)</em><br><br>Generally, PCBs and components are good for -40 to +85°C. Anything below 60°C on this board is fine and nothing to worry about. If the temp is above that, try blowing on it like you would a hot chip out of the oven.</p>
<h5>Firmware Version</h5>
<p>The BaldrickInput1 is pretty new in the world of controllers and we've got a LOT of features left to add, this will let you know your current version and if there is a version to upgrade to.<br><br><em>(clicking the new version will upgrade it in place then restart the controller)</em></p>
<h5>IP Address</h5>
<p>It would be pretty silly to have a controller information box without showing you the IP Address of the controller wouldn't it? That would be like launching a controller without being able to manage the networking.</p>
Turniput Configuration
External Input Triggers
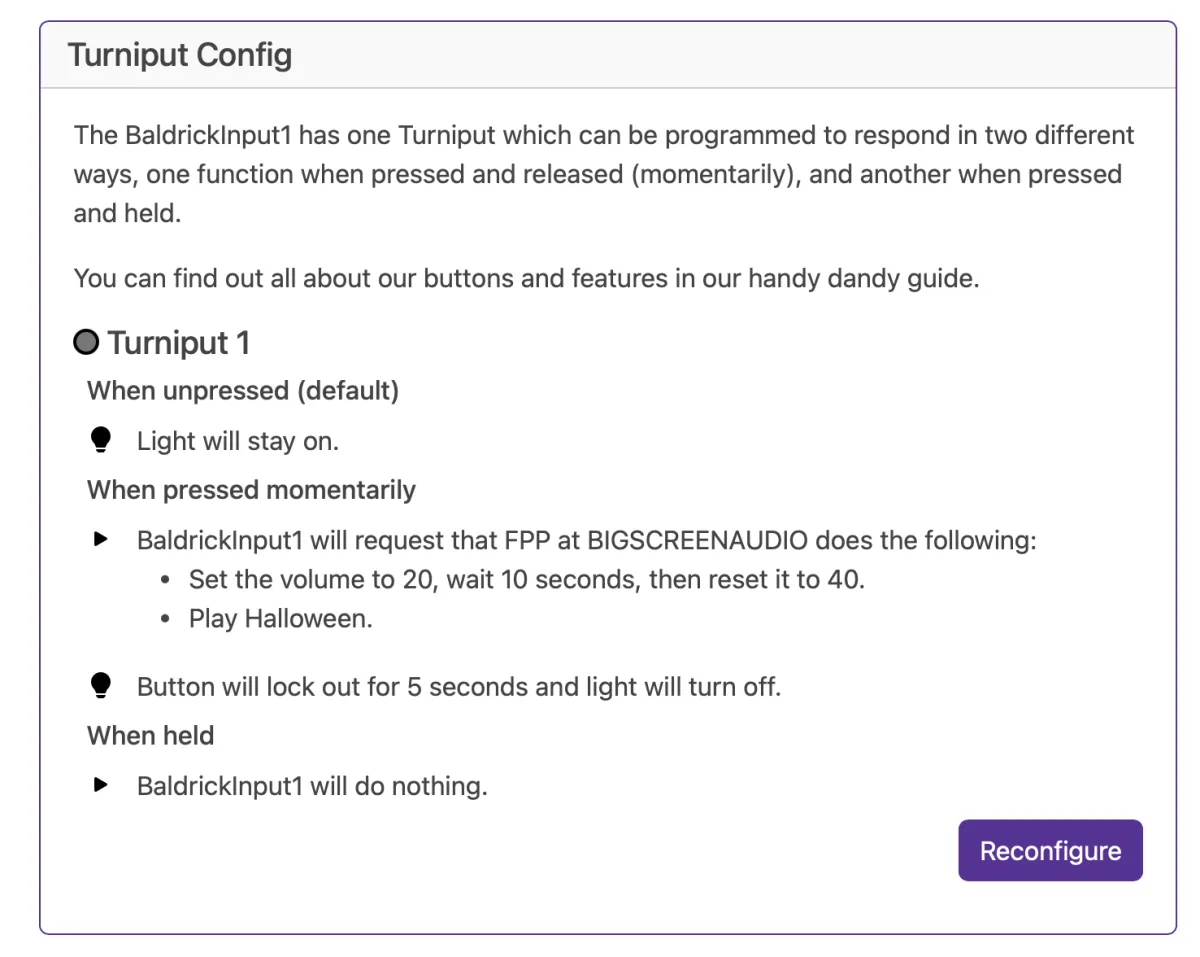
The BaldrickInput1 comes with a single Turniput port to attach external triggers (buttons, beam breaks, motion sensors) that can be configured when triggered to do a multitude of tasks.
Available Actions
  <h6 id="fpp-integration">FPP Integration</h6>
  <p>Control FPP (Falcon Pi Player) instances, change volume, play songs/playlists, or call FPP API directly.</p>
  <h6>Toggle Test Mode</h6>
  <p>Quickly enable any test mode at a specific brightness for quick prop testing.</p>
  <h6>BaldrickSwitchy Control</h6>
  <p>Turn on/off BaldrickSwitchy ports for specific durations (bubble machines, snow machines, etc.).</p>
  <h6>BaldrickDMX Presets</h6>
  <p>Activate preset commands on your BaldrickDMX for moving heads, effects, etc.</p>
  <h6 id="http-url-calls">HTTP URL Calls</h6>
  <p>Call web APIs from simple triggers - perfect for custom integrations.</p>
  <h6>Do Nothing</h6>
  <p>Sometimes you set an input to do something and think "oh actually no, that's not what I want."</p>
The main difference between this and the Button input on the Baldrick8 is the addition of Lamp controls.
Networking Configuration
Good Defaults, Easy Config
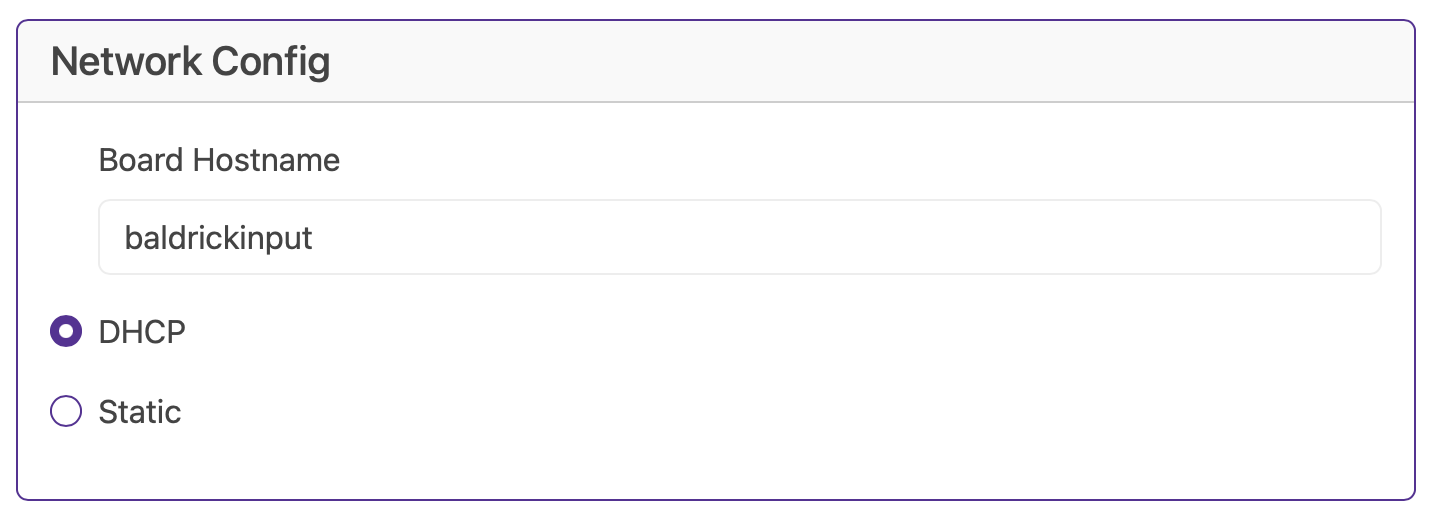
<b>Note</b> WiFi on the Input1 is currently in testing and will be released soon.
<h5>Hostname</h5>
<p>The default hostname is baldrickboard (hence baldrickboard.local). If you have one BaldrickInput1 then it's completely fine to keep this as it is, however if like us you want to collect a few of them, then we'd recommend you change this to something like <em>frontgarden</em> or <em>upstairsroof</em><br><br><strong>(Just a reminder that hostnames should be lowercase without spaces)</strong></p>
<h5>DHCP / STATIC</h5>
<p>The default option is DHCP (which is Dynamic Host Configuration Protocol but you don't need to know that) which basically means your router or computer gives the board an I.P. address. This is great for initial setup but when you want to run a show it's best to switch it to STATIC, that's where your controller tells the router / computer "This is my IP".</p>
<h5>IP Address</h5>
<p>Set this to the IP address that you want the controller to be fixed to.</p>
<h5>Subnet Mask & Gateway</h5>
<p>It is more than likely that you can copy the Subnet Mask (the size of your network) and the Default Gateway (the exit point of your network) from the output of an IPconfig check.</p>
<h5>DNS Server</h5>
<p>DNS wise, typically, your default gateway is your router IP, and that more often than not, can provide your network with DNS. However, some people like to use "outside 3rd parties" DNS like google or cloudflares DNS. If you don't know about this, its probably best just to stick to DHCP.</p>
Turnip Network
The Turnip Network
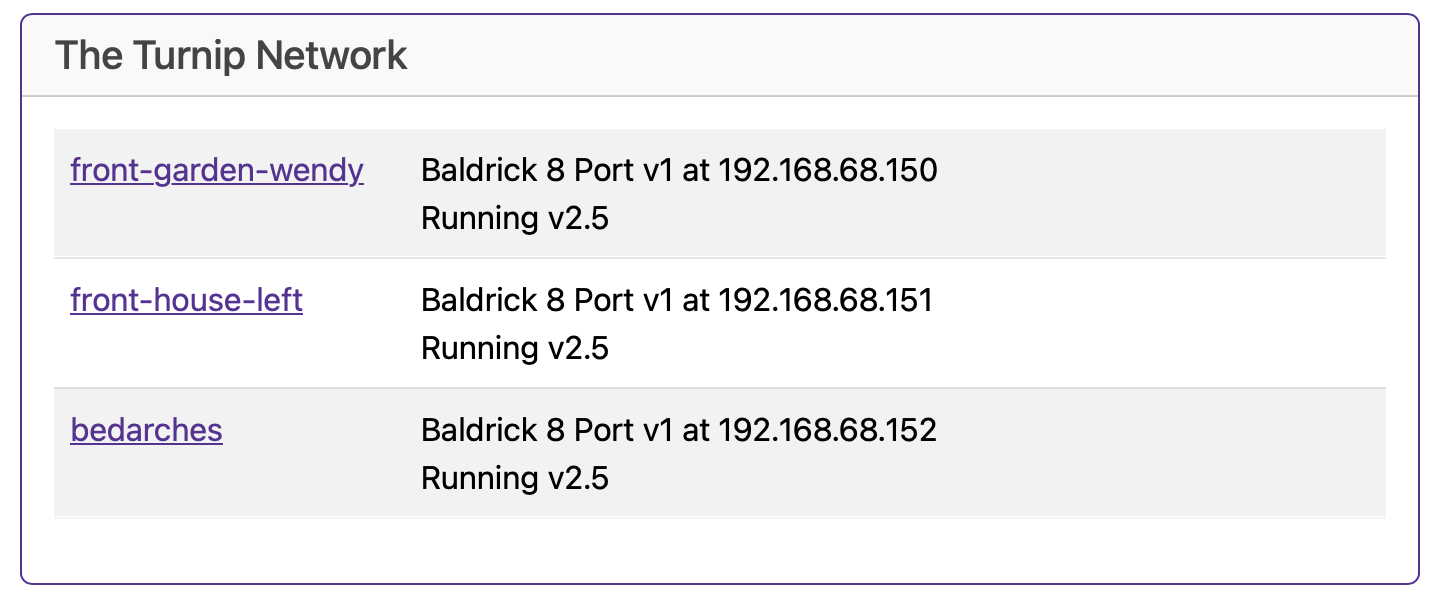
The Baldrick family of boards have developed with ease of use as one of the core principles, this lead the creation of ‘The Turnip Network’.
The BaldrickBoards will find each other on the network, allowing you to easily switch between them when doing configuration.
Test Sync allows you to enable test mode on one Baldrick board and all the others in that series will follow (so when you turn Hodgical Test Mode on one Baldrick8, it will turn on the rest of them).
Some of the Baldrick boards have buttons (or Turniputs) and these allow integration with not only all the other boards in the family, but also FPP and web hooks!
::: note It’s what those people in business suits call ‘synergy’! :::
Advanced Settings
Advanced Configuration Options
Advanced settings provide additional configuration options for power users and complex installations.
Coming Soon
Advanced settings documentation will be added as new features are developed and released.